


Feel Your Sound: Sundog Song Studio and Melodic Flow
Today we’re reviewing an amazing pair of chord and scale composition tools from Feel Your Sound – Sundog Song Studio and Melodic Flow. We reached out to Hauke, the developer of this software and asked to give the technology our take. After some extensive time spent with each tool we have a lot of insight to share, below we will go through how to use each and share with you the benefits and drawbacks (if any) of both programs. Sundog is especially complex if you want to dive into its abilities so we’ll give you the rundown on the basic workflow.
[su_divider top=”no” divider_color=”#d2d2d2″ size=”1″]
Sundog Song Studio
Sundog Song Studio is a standalone all-in-one composition tool. You can write melodies, basslines, chord progressions, and even drumlines. Initially, the prospect of using a standalone software to generate ideas sounded tedious but Hauke programmed a solution to curb our fears. You can connect Sundog to your DAW through a virtual MIDI bridge! You can even set it up to play from your MIDI keyboard. Read below as we guide you through the setup process for MIDI, then on how to get started writing melodies and progressions.
[su_divider top=”no” divider_color=”#d2d2d2″ size=”1″]
Setting Up MIDI
Why is this helpful? You can send MIDI signals out from Sundog into Ableton (our preferred DAW) so you can use your own VSTs or Ableton devices. Follow the steps below for Mac OS (from the feelyoursound website thanks Hauke!)
- Launch the “Audio MIDI Setup” of OS X
- Open the “Window” menu and click on “Show MIDI Studio”
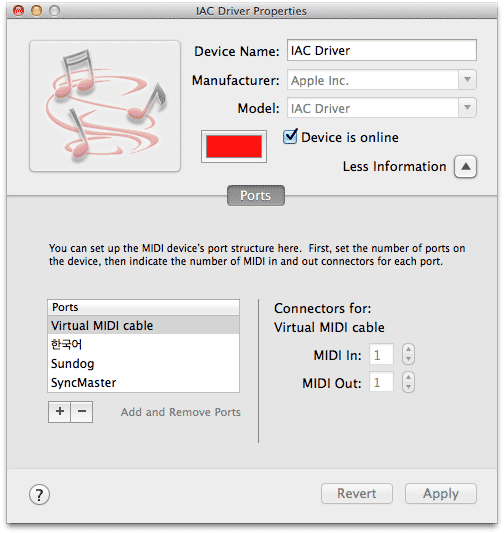
- Double-click on the IAC Driver icon
- Activate the “Device is online” checkbox
- You can rename the Device Name if you like, but please only use characters that are available on an English keyboard! “IAC Driver” is fine, “哈佬” not so much.
- Create a new port by clicking on the “+” button below “Ports” (see the screenshot below). Again: Name the port as you like, but only use English characters (the second port name in the screenshot wouldn’t show up in the feelyoursound.com software, for example).
- Restart your DAW and your feelyoursound.com software
- Set the MIDI Input of the DAW to the newly created MIDI port
- Set the MIDI Output of the feelyoursound.com software to the newly created MIDI port as well
- You’re done!
For those of you using a Windows PC then follow these steps below, you’ll need a third party MIDI bridge, Hauke suggests LoopBe1. Tobias Erichson made virtualMIDI which is also tried and true. Follow the steps below for either.
- Download LoopBe1 from nerds.de
- Install it. It will register itself as a virtual MIDI driver
- Open the settings of your feelyoursound.com software and select “LoopBe Internal MIDI” as output device
- Open the settings of your DAW / other MIDI software and choose LoopBe as MIDI input
- You’re done!
- PS: Sometimes LoopBe1 might mute itself (e.g. when a feedback loop occurs). This happens in rare cases. If no MIDI data is coming through, you should right-click the LoopBe tray icon and see whether it is muted.
Once you’ve set up your virtual MIDI ports open up your DAW preferences and confirm that the MIDI port is open and connected. See below.
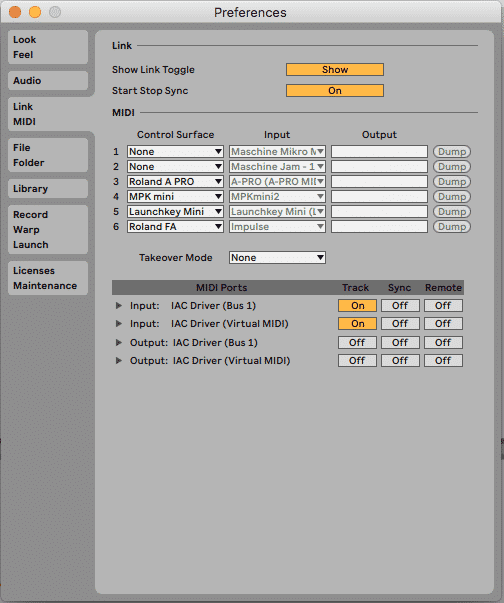
Once you confirm that it is, go to your tracks and match them to the corresponding instrument channels in Sundog. There are 15 available channels in Sundog so you can create and send up to 15 different instruments’ patterns to your DAW.
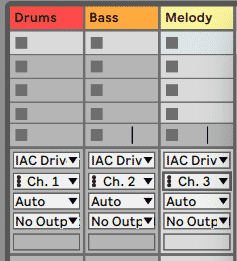

Are you wondering about how to use Drum Racks inside of Ableton? That one is easy enough to figure out. Choose a drum rack and the open up the Chain List (middle button on the upper left of your rack). There you can select individual MIDI channels for each drum instrument. Since you only have 15 channels to work with from Sundog you need to decide whether or not it is worth dedicating the channels.

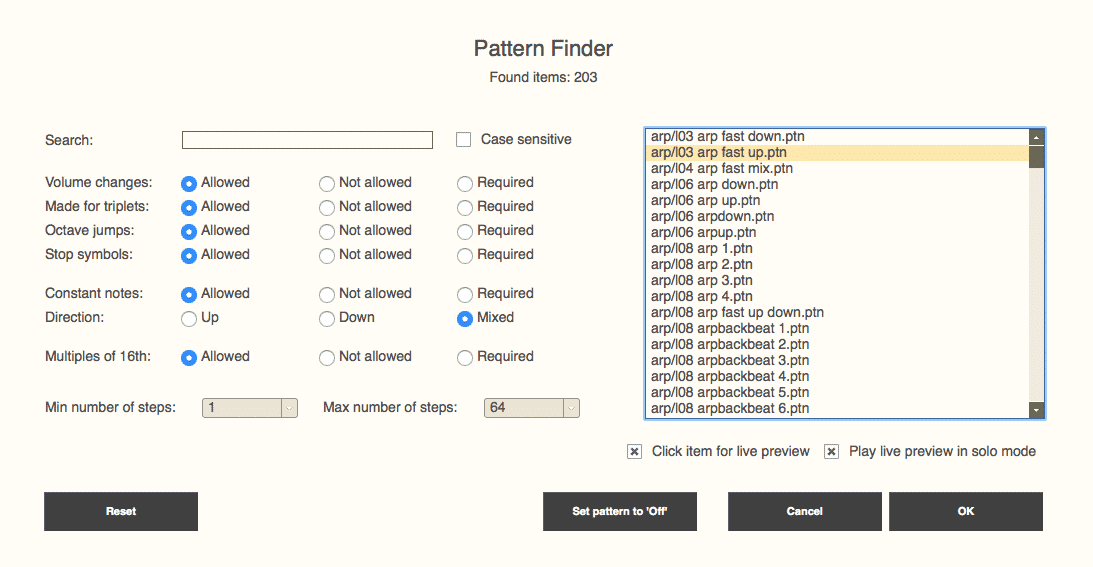
An argument for utilizing Sundog for your drum beat is that you can choose from 203 patterns it comes loaded with. Read below to learn how to use Sundog to make custom patterns and progressions.
[su_divider top=”no” divider_color=”#d2d2d2″ size=”1″]
Making Patterns and Progressions
Sundog makes it very easy to get started, all you have to do is draw in the melody you want to play and then the sounds you chose in your DAW will play.
First, select the root note and scale to play within a specific song key. There are a huge number of scales to choose from. Now any note you choose will be in the correct key.

Second, select some chords by pressing the chords button at the top. Sundog offers an awesome selection of chords to choose from. You can preview the chord by clicking on it. The bars across the top correspond to the bars in your loop, the numbers represent the chord number. 3 is the 3rd chord in the scale, 5 is the 5th, etc.

Click keys on the piano at the bottom to add or subtract notes from the chord. When you are finished, click the ‘use chords’ button to save your selection. The pattern box acts as a sequencer/arpeggiator and it will act differently based on the Source you have chosen for your pattern trigger. The manual had some specific info about Source.
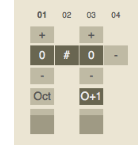 Numerical values will trigger a note that depends on the “Source” mode of the Pattern Trigger area.
If the source is set to “Scale Notes”, a value of 0 will play back exactly the note that is displayed in the yellow input editor of the Pattern Trigger area. A value of 1 will trigger the next scale note above 0, and so on.
If the source is set to “Chord Notes”, then 0 will trigger the base note of the currently active chord. A value of 1 will trigger the second note of the chord, and a value of 2 will trigger the third note.
If the source is set to “Full Chords” or “Full Chords+”, any value will trigger the full chord. Use the “Oct” field to work with different chord pitches.
The pattern trigger is one of the many features that sets this software apart from other composition tools. You can draw in patterns by the direction they head pitch-wise. That is a pretty innovative feature for a composition tool we have only ever seen here.
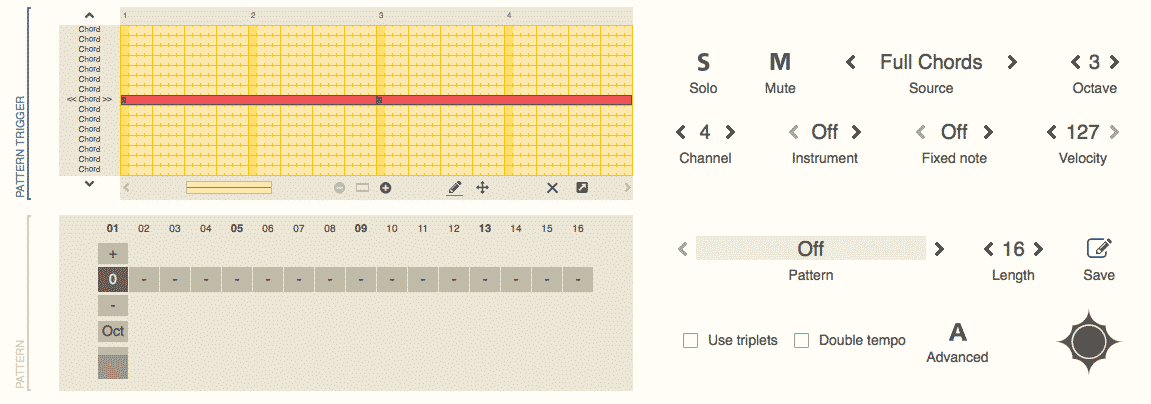
You can either draw in the pattern yourself or click on the “off” button to open up the Pattern Finder. Use the Pattern Finder to find pattern presets. Once you’ve found a preset you like then dial in pattern parameters on the left side of the Pattern Finder.
Sundog is
[su_youtube_advanced url=”https://youtu.be/eZHiREIfdbo” showinfo=”no” rel=”no” modestbranding=”yes” https=”yes”] [/su_youtube_advanced]
[su_divider top=”no” divider_color=”#d2d2d2″ size=”1″]
MelodicFlow
MelodicFlow is another composition tool from Feel Your Sound. This plugin is a more compact tool to create chords and melodies within a set key. Those of you using Ableton Live already may be familiar with the MIDI effect ‘Scale’ – MelodicFlow is the beefed up brother of that effect.
Setting Up
A simple set up is first required for MelodicFlow. Ableton users can refer to the image below, others follow along in your own DAW.

Place MelodicFlow on a MIDI channel and open another instrument on another. Arm the MelodicFlow channel, and select “In” for monitoring your instrument channel. Set the “MIDI In” on your instrument channel to receive the MelodicFlow MIDI. Read below to see the various modes MelodicFlow offers.
Modes
To get the most out of MelodicFlow you must understand the different modes of operation. Read below to understand their different abilities.
- Chords: Only the chord notes that are played on the left side of the keyboard are used to calculate the output notes.
Useful for arpeggios, basslines, simple background melodies. - Chords + scale: The output notes are calculated from all the notes of the current chord and the notes of the chosen scale. The first white box will always start on the first chord note.
Useful for melodies that concentrate on the bass note of the current chord and need to be more complex than simple arpeggios. - Scale: Only the notes of the chosen scale will be used, the chord notes are ignored.
Useful for lead melodies. - Scale + chords: The output notes are calculated from all the notes of the current chord and the notes of the chosen scale. The first white box will always start on the root note of the scale.
Useful for lead melodies. - Chords + scale (safe): The output notes are calculated from the notes of the current chord and the notes of the chosen scale. The chord notes and the root note of the scale are used in all cases. The rest of the scale notes are only used if they are at least two semitones away from other notes. This makes sure that only “harmonic” notes are available as possible output notes. The first white box will always start on the first chord note.
Useful for harmonic melodies that concentrate on the bass note of the current chord. - Scale + chords (safe): The output notes are calculated from the notes of the current chord and the notes of the chosen scale. The chord notes and the root note of the scale are used in all cases. The rest of the scale notes are only used if they are at least two semitones away from other notes. This makes sure that only “harmonic” notes are available as possible output notes. The first white box will always start on the root note of the scale.
Useful for harmonic, catchy lead melodies. - Scale from chord bass: The output notes are calculated from the first note of the current chord and the notes of the chosen scale. The first white box will always start on the first chord note.
Useful for basslines that concentrate on the bass note of the chord, but need to walk up or down the scale from time to time.
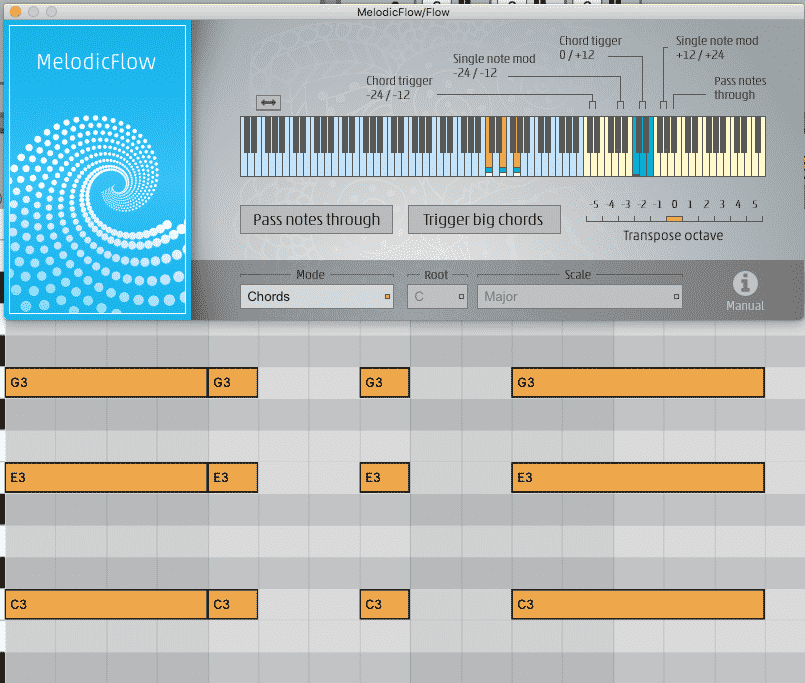
The most basic function of MelodicFlow is to transpose any note you play to the key of the chord being played. Look in the photo above, a C Major chord is being played. By pressing the notes in dark blue you can also
[su_youtube_advanced url=”https://youtu.be/8MXPT-cfJO8″ showinfo=”no” rel=”no” modestbranding=”yes” https=”yes”] [/su_youtube_advanced]
Create a Chord Master Track
Hauke gifted us all with a great idea for using the MelodicFlow plugin – the Chord Master Track. You use MelodicFlow to lock in the for different subgroups like on your bass, melody, or on an arpeggiating instrument. Look at the image below for a quick visual guide, and watch the video below that for the in-depth setup.

[su_youtube_advanced url=”https://youtu.be/Rz1FpXlyrG4″ showinfo=”no” rel=”no” modestbranding=”yes” https=”yes”] [/su_youtube_advanced]
Conclusion
Feel Your Sound is up to some great things with their Sundog Song Studio and MelodicFlow tools. You can easily craft full songs from within Sundog and if you prefer to write within your DAW just pop MelodicFlow onto some channels.
If you are interested in buying Sundog Song Studio click here to purchase for $65. Click here to purchase MelodicFlow for $45.
We covered an awesome FREE Ableton project a while back that compiled all of the musical scales onto MIDI clips. Click here to read about it.
[su_divider top=”no” divider_color=”#d2d2d2″ size=”1″]
Do your composition skills need some improvement? Youtube videos aren’t cutting it anymore? Learn more about Beat Lab Academy’s Super Producer program below where you can learn how to write music and make incredible beats.
[su_divider top=”no” divider_color=”#d2d2d2″ size=”1″]
Featured Masterclass


0 responses on "Feel Your Sound: Sundog Song Studio and Melodic Flow"